Accessing Jellyfin From Anywhere: A Guide

Accessing Jellyfin From Anywhere: A Guide

Posted on

Accessing Jellyfin Outside Your network: A Comprehensive Guide

Jellyfin is a powerful open-source media server that allows you to organize, stream, and share your media library across various devices. While enjoying your media collection within your home network is straightforward, accessing it from outside your home requires some additional configuration. This guide will walk you through the essential steps to access your Jellyfin server remotely and enjoy your media library from anywhere.

  • Understanding the Challenge
  • By default, your Jellyfin server is accessible only within your local network (LAN). This is because your router assigns your devices private IP addresses, which are not routable on the public internet. To access Jellyfin from outside your home, you need to establish a connection between your external network (the internet) and your internal network.
    Accessing Jellyfin From Anywhere: A Guide
    How to Access Jellyfin Remotely in – WunderTech
  • Key Concepts
  • Before diving into the configuration process, let’s understand some key concepts:

    Public IP Address: This is the unique address assigned to your home network by your internet service provider (ISP). It’s how your network is identified on the internet.
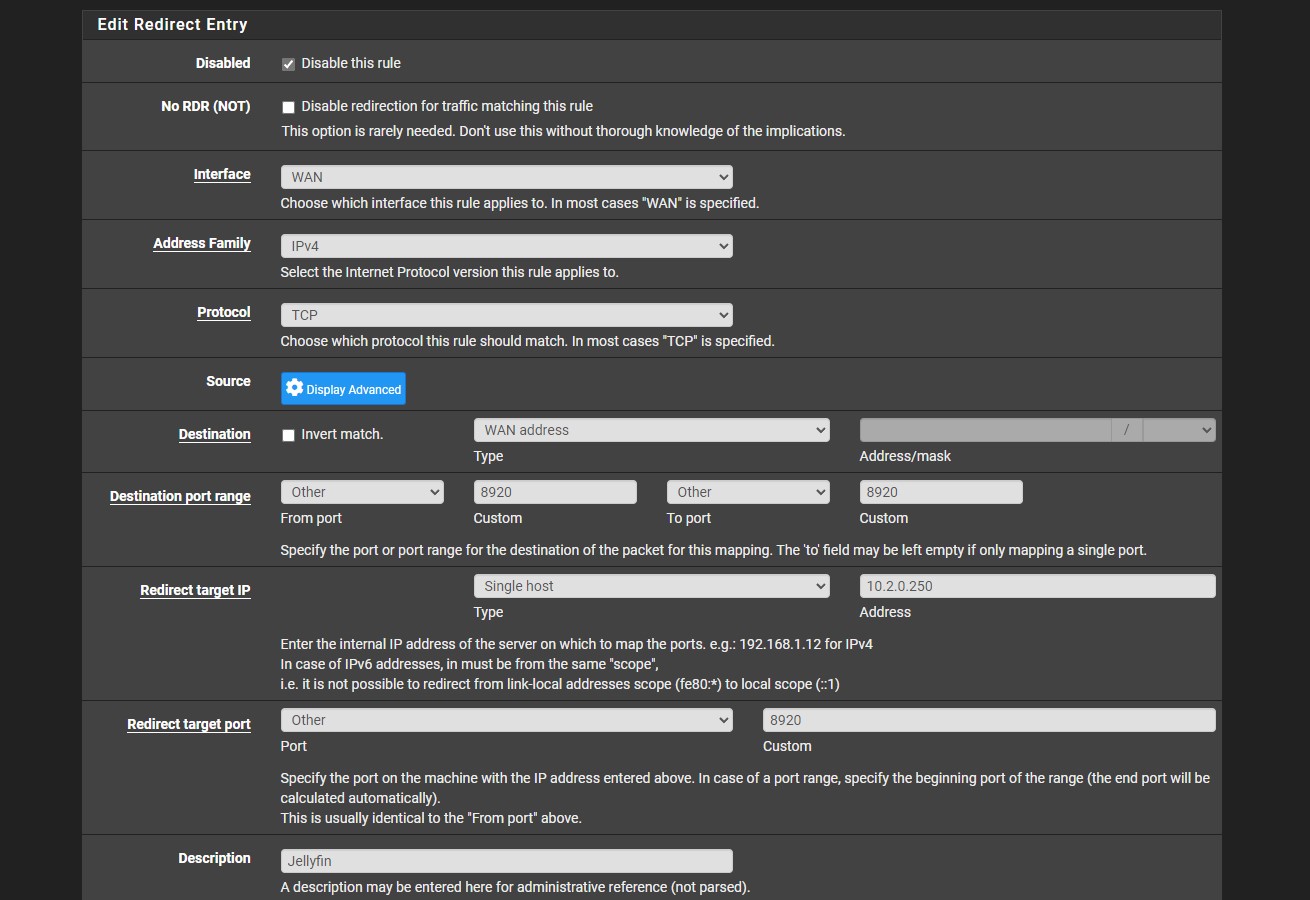
  • Port Forwarding: This process directs incoming traffic on a specific port (e.g., 8096, the default port for Jellyfin) on your router to the specific device (your Jellyfin server) on your local network.
  • Dynamic DNS: Your public IP address may change periodically. Dynamic DNS services provide a stable, easy-to-remember domain name that resolves to your current public IP address, even if it changes.

  • Methods for Remote Access
  • image.title
    Access Jellyfin server on different subnet Netgate Forum

    There are several methods to access Jellyfin outside your network:

    1. Port Forwarding and Dynamic DNS

    This is the most common method. It involves:

    Port Forwarding: Configure your router to forward incoming traffic on the Jellyfin port (usually 8096) to the internal IP address of your Jellyfin server.

  • Dynamic DNS: Obtain a dynamic DNS service (e.g., No-IP, DuckDNS) and configure it to update your domain name with your current public IP address.

  • 2. VPN (Virtual Private Network)

    A VPN creates a secure, encrypted tunnel between your device and your home network. This allows you to access your Jellyfin server as if you were on your local network.

    3. Cloud Solutions

    Some cloud providers offer solutions for hosting your Jellyfin server, simplifying remote access.

  • Step-by-Step Guide: Port Forwarding and Dynamic DNS
  • 1. Determine Your Public IP Address
  • Visit websites like “whatismyip.com” to find your current public IP address.

  • 2. Configure Port Forwarding
  • Access your router’s administration panel (usually by entering its IP address in your web browser).

  • Find the “Port Forwarding” or “Virtual Server” section in your router’s settings.
  • Create a new port forwarding rule:
  • External Port: The port you want to use for remote access (e.g., 8096).
  • Internal Port: The same port (8096).
  • Protocol: TCP.
  • Internal IP Address: The IP address of your Jellyfin server on your local network.

  • 3. Obtain a Dynamic DNS Service
  • Sign up for a free dynamic DNS service like No-IP or DuckDNS.

  • Create an account and choose a domain name (e.g., “myjellyfin.no-ip.org”).
  • Download and install the dynamic DNS client provided by your chosen service.
  • Configure the client to update your domain name with your current public IP address.

  • 4. Access Jellyfin Remotely
  • Open the Jellyfin app or web client on your device.

  • Enter your dynamic DNS domain name (e.g., “myjellyfin.no-ip.org:8096”) in the server address field.

  • 5. Configure Jellyfin Server (Optional)
  • Access the Jellyfin web interface.

  • Go to Dashboard > Advanced > Networking.
  • Enable “Allow remote connections to this server.”
  • (Optional) Configure remote IP address filters to restrict access to specific IP addresses or networks.

  • Troubleshooting
  • Check your firewall: Make sure your router’s firewall and any software firewalls on your Jellyfin server are not blocking incoming connections on the forwarded port.

  • Verify port forwarding: Double-check your router’s port forwarding rules to ensure they are correctly configured.
  • Test your dynamic DNS service: Use a command-line tool like `ping` to test whether your dynamic DNS domain name resolves to your current public IP address.
  • Check your internet connection: Ensure you have a stable internet connection with sufficient upload speed.

  • Security Considerations
  • Strong passwords: Use strong, unique passwords for your Jellyfin server and your dynamic DNS account.

  • HTTPS: Enable HTTPS encryption for secure communication between your devices and the Jellyfin server.
  • Remote access restrictions: Use IP address filters to restrict remote access to trusted devices or networks.
  • Regular updates: Keep your Jellyfin server software and any other relevant software up-to-date with the latest security patches.

  • Conclusion
  • By following these steps, you can successfully access your Jellyfin media server from anywhere in the world. Remember to prioritize security and adjust the configuration to suit your specific needs and preferences. Enjoy streaming your media library seamlessly!

    Leave a Reply

    Your email address will not be published. Required fields are marked *